Editing Documents
Edit content, rename, update versions, manage metadata, split, merge, and delete documents.
DocQ provides a comprehensive set of tools for modifying documents throughout their lifecycle. Most editing operations are only available while a document has Active status.
Document List
The document list is your starting point for all document operations. Use the filters at the top to narrow results by status, workflow, group, date, and other criteria.

You can also customize the list display through List Settings, which control visible columns, sort order, and pagination.
Editing Document Content
DocQ includes an embedded text editor for .docx files, allowing you to edit document content directly in the browser without external software.
Info
Content editing is only available for .docx files. PDF documents cannot have their content edited within DocQ, though they do support annotations and highlights during review. See Office Editing for full details on the embedded editor.
Key rules for content editing:
- The document must have Active status.
- When a
.docxdocument receives signatures, it is automatically converted to PDF. - A document remains editable even after approval, as long as no signatures have been applied.
Renaming Documents
To rename a document:
- Click on the document name in the document list to open the detail view.
- Locate the Document name field.
- Enter the new name.
- Click Update name to save.
Warning
Documents with Completed status cannot be renamed. Finalize the document name before the workflow reaches completion.
Uploading a New Version
To replace the current document file with an updated version:
- Open the document detail view.
- Click the Upload file button.
- Select the new file from your computer.
The new file replaces the current version. Any existing signatures on the document are discarded when a new version is uploaded.
Warning
Uploading a new version is only available for documents with Active status. All current signatures will be removed.
New Versions with Pending Signatures
If the document is in a parallel workflow step with a pre-approval configuration and has pending signatures from other recipients, DocQ presents a pop-up with options for how to proceed. You can choose whether to discard the pending signatures or handle them according to your workflow requirements.
For more details on version management, see Versions & History.
Updating Metadata
Documents in DocQ can carry two types of metadata:
- Form metadata -- Fields populated from a linked form during document creation.
- Custom metadata -- Additional fields added manually to individual documents.
Editing Metadata Values
Metadata changes are applied prospectively -- they affect the document going forward but do not alter historical records.
Metadata can only be updated by users who currently have the document in their workflow queue, and only while the document is in Active status.
Adding Custom Metadata Fields
To add a custom metadata field:
- Open the document detail view.
- Navigate to the Metadata menu.
- Click +Add Metadata.
- Enter the field name and select the field type (text, number, date, etc.).
- Save the new field and set its value.
Scheduling Reminders
You can schedule reminders for a document to notify yourself or others about upcoming deadlines or required actions.
When creating a reminder, configure:
- Destination -- Send to a DocQ in-app notification or an external email address.
- Date -- The date and time the reminder should trigger.
- Custom message -- A personalized note included with the reminder.
- Attach document -- Optionally attach the document to the reminder notification.
Changing the Workflow
To reassign a document to a different workflow:
- Open the document detail view.
- Locate the Document Workflow section.
- Select the new workflow from the dropdown.
- Click Update workflow.
This action is only available for documents with Active status. The document will restart processing from the beginning of the newly assigned workflow.
Moving to Another Step
To manually advance or move a document to a different step within its current workflow:
- Open the document detail view.
- Enter a reason for the move (required for audit purposes).
- Click the Move to another step button.
- Select the target step.
This is only available for Active documents and is recorded in the document history.
Splitting a Document
DocQ allows you to split a PDF document into multiple separate documents.
Manual Split
- Open the document detail view for a
.pdffile. - Click the Split button.
- Define the page ranges for each resulting document.
- Assign a name and workflow to each split segment.
- Optionally toggle Complete master document lifecycle to mark the original document as completed after the split.
Info
Splitting is only available for .pdf files. You can also configure an automated Split step within a workflow to split documents as part of the processing pipeline. See Step Types for details.
Automated Split
Workflows can include a Split step that automatically divides documents based on configured rules. This is useful for high-volume processing scenarios where documents need to be separated without manual intervention.
Merging Documents
To combine multiple PDF documents into a single file:
- Open any document and click the Merge Documents button.
- Click Add to select additional documents to include in the merge.
- For each document, select the page ranges to include.
- Arrange the documents in the desired order.
- Assign a name and workflow to the merged document.
- Optionally add a note for reference.
- Toggle Complete lifecycle for any source documents you want to mark as completed after the merge.
Warning
Merging is only available for .pdf files. Documents with Completed status cannot be included in a merge operation.
Deleting Documents
To delete a document:
- Select the document in the document list.
- Click the Delete button.
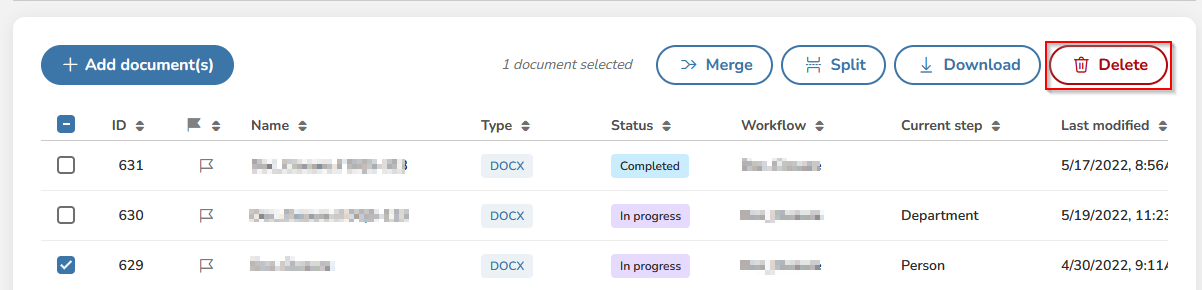
Warning
Documents with Completed status cannot be deleted. Only Active documents can be removed.
Trash
Deleted documents are moved to the Trash, where they are retained for 30 days. During this period, you can restore a deleted document back to its previous state. After 30 days, documents in the Trash are permanently removed.
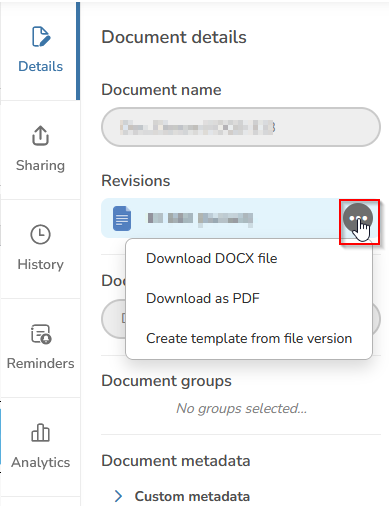
Downloading Documents
To download a document:
- Open the document list and click on the document name.
- Navigate to the Details tab.
- Click the three-dot menu (more options).
- Choose the desired download option.
Next Steps
- Sharing Documents -- Share documents for review or e-signatures
- Versions & History -- Track version changes and audit trails
- Office Editing -- Edit
.docxcontent in the embedded editor