Conditions & Routing
Configure IFTTT-based conditional routing to create multi-path workflows.
By default, each workflow step routes the document to a single next step on approval and a single next step on rejection. Conditions allow you to override this default behavior and create multiple alternative paths based on the values of template variables, document properties, or DocQ properties.
Default Step Selection
Every step (except the End step) must have a default next step configured for both the Approve and Reject outcomes. If a step is missing its default next step, it will be highlighted with a red border on the canvas.
To set the default next step:
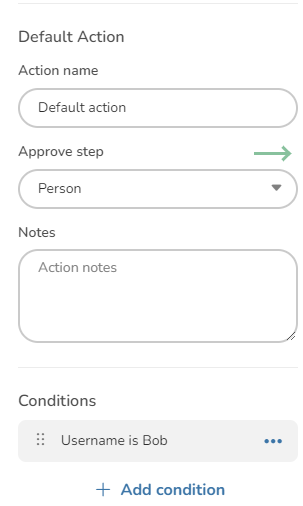
- Click the step on the canvas to open its settings.
- In the Edit Step panel, locate the Default Action section.
- Use the Approve step dropdown to select which step the document goes to when approved.
- Use the Reject step dropdown to select which step the document goes to when rejected.
Warning
A default next step is always required, even if you add conditions that cover every possible outcome. The default step acts as a fallback when no conditions are met.
Adding Conditions (IFTTT)
Conditions follow an if-this-then-that (IFTTT) pattern: if a variable meets a specified criterion, then route the document to a particular step instead of the default.
To add a condition:
- In the step's settings panel, locate the Conditions section below the Default Action area.
- Click +Add condition to create a new condition.
Prerequisites
Before conditions can evaluate template variables, you must associate a document template with the workflow:
- Open Workflow Properties (accessible from the Settings panel on the right).
- Select a template from the Document template dropdown.
Once a template is selected, its variables become available for use in conditions. You can also test against document properties (such as name, status, or creation date) and DocQ properties (such as the current user or date).
Setting Up a Condition
After clicking +Add condition, configure the condition as follows:
- Field — select the variable, document property, or DocQ property to test from the dropdown.
- Operation — choose the comparison operation. The available operations depend on the variable type (e.g., equals, contains, greater than, less than).
- Value — enter the value to compare against. For the Contains keywords operation, enter multiple keywords separated by commas.
- Approve step — select the step the document should go to if the condition is met and the action is approval.
- Reject step — select the step the document should go to if the condition is met and the action is rejection.
The condition is also represented visually as a blue arrow on the canvas, connecting the current step to the conditional target step.
You can optionally provide an Action name to label the condition for easier identification on the canvas and in reporting.
Info
You must select a next step for at least one outcome (approve or reject) in each condition. If a condition does not define a step for one outcome, the default step is used for that outcome.
Multiple Conditions
Click +Add condition to add as many conditions as needed. Conditions are evaluated in order, and the first matching condition determines the routing. If no conditions match, the default step is used.
Condition Groups
Conditions can be organized into groups. Within a condition group, all conditions must be satisfied for the group to be considered met. Across groups, any single group being satisfied is enough to proceed with its approval path.
The evaluation logic works as follows:
- If any group is satisfied (all conditions within that group are met), the document follows the approval path defined by that group.
- If no groups are satisfied, the document follows the rejection path.
This structure allows you to create complex multi-criteria routing logic — for example, routing a document to a senior approver only when both the amount exceeds a threshold and the department matches a specific value.
Next Steps
- Step Types — learn about the step types that support conditional routing.
- Workflow Settings — associate a document template to enable variable-based conditions.
- Troubleshooting — resolve issues with conditions that reference missing variables or steps.